
Setting Up the SDR-1000 for WSJT using VAC 4.03
(Checkout the thumbnails above for full screen shots of VAC / WSJT working seamlessly with PowerSDR)
When I first got into VHF and above, I was using HSCW for working meteor scatter contacts on 2 Meters. This was a lot of fun and I eventually began to use WSJT as the software of choice for meteor scatter work. As time went by, I utilized WSJT in contests on occasion to eek out a few more multipliers. However, the way I had things set up with WSJT and the sound cards, I had to change setting after I was done to get my computer back to doing normal stuff.
The down time between contests led me to also forget how to get WSJT and my “rig blaster” set up again and I was always scrambling to get it working in the middle of the night. I then too had a few shack rebuilds going on in the last few years and the WSJT setup never got a priority for getting reconnected.
This was somewhat frustrating as I did like working meteor scatter work using WSJT, but there were only so many hours in the day to maintain things in the shack, especially when the kids were climbing all over me. So getting WSJT set up once again took a back seat until just recently.
During the winter of 05 and spring of 06, one more major effort was underway in the KMØT hamshack. The shack was renovated utilizing the SDR-1000 as the IF radios needed for my VHF and up work. During this time, I dreaded to figure out how to get my WSJT setup working, as getting the rest of the shack integrated and working reliably was not enough work in itself.
I had heard varied reports on using WSJT and other ham related Digital/PSK type programs with the SDR-1000. Some were doing the traditional setup using a “rig blaster” interface with a separate sound card, and some were using a thing called VAC – or “Virtual Audio Cable”. This sounded like a really great thing as it eliminated the need for another sound card or “rig blaster” interface. However in the early days of this implementation, there were some complicated setup issues. So I decided to wait around for the PowerSDR software and the VAC software to mature a bit more before I jumped in.
During the summer or so of 2006, there was a call out for better “VAC” software to interface the digital programs to the SDR-1000. However, this was not to be a small undertaking by the programmers and it needed to be done right, thus it would take some more time. In the early Fall of 2006, VAC version 4.03 came out and I made a few requests on how to get it all setup. A few knowledge base articles on the Flex-Radio website showed in general how to set it all up, although I needed a few holes filled in. I figured then that the only way to do it was to try it myself and work through my mistakes. As it turned out, it was not too hard, just kind of complicated in terms of how it all fits together. When I finally got most of it put together, Terry – WØVB helped me out with the last few settings that I was not getting right, then it was all A-OK! Thanks Terry!
The article I’m writing here will show a detailed description of how I setup VAC 4.03 with PowerSDR in order to use WSJT. Perhaps this will help a few out who have not yet decided to take the plunge.
Step 1: The obvious….
Get a SDR-1000 and hook it up to your VHF transverters. Details on this are found in many other places on the KMØT website J
Step 2: Download the software…
You need to get three other programs. One – Download WSJT by Joe Taylor - K1JT. Two – Get Virtual Serial Port Driver by Phil Covington – N8VB. Three – Get VAC 4.03 from Eugene Muzychenko’s website.
Weak Signal by Joe Taylor - WSJT: http://pulsar.princeton.edu/~joe/K1JT/
Don’t forget to thank Joe for the program, as he did an awesome job with this package that contains FSK441 for use on meteor scatter and the JT65 modes for weak signal tropo or EME work! Get the program installed with your Grid, UTC offset, etc. setup. We will discuss the parameters of setup within WSJT further down in the description.
N8VB vCOM - Virtual Serial Port Driver: http://www.philcovington.com/SDR.html
( Scroll down to this part of the webpage and click on where it says the latest build – “source and binary” link. I was not able to get it to download from the “Download” button for some reason. )
In order to do PTT program control of WSJT and VAC in conjunction with PowerSDR, virtual com ports need to be installed. This allows the CAT control within PowerSDR to interface with WSJT in order to transmit and receive in the “Auto” mode. Essentially it allows PTT control from WSJT to PowerSDR to put the SDR-1000 into transmit. Keep in mind that you have to have the SDR-1000 hardware setup with a PTT sequenced output connected to your transverters and amps. This means that when WSJT tells PowerSDR to transmit, then the SDR-1000 hardware sequenced output pin 7 on the X2 connector also activates your transverter and amp into the TX mode.
If you are able to donate to Phil's efforts, I'm sure its much appreciated. There are links on his site to do so.
Virtual Audio Cable - VAC 4.03: http://software.muzychenko.net/eng/vac.html
This is not a free program, one must pay in some fashion to get a URL to download the full version of the software. I have heard that the trial version wont work as it has audio in its output at a certain interval to indicate that it is the trial version.
I used Paypal and received the URL link to download the software within a few hours. It all worked out fine, your mileage may vary.
Step 3: Install vCOM
Double Click the executable file N8VBvCOMSetup-226a.exe (or later version) and follow the prompts.
For my use, I just installed the “Driver Files” not the “Source Files”. When it comes to the “Windows Logo Testing” click on “Continue Anyway”.
Look for the N8VB vCOMDriver program on the “All Programs” menu and click on the VComConfigurator.
From what I understand, you need two pairs of ports, so I just went with COM5 / COM6 and COM7 / COM8 as the two pairs. Some may have to go a bit farther up in number to eliminate conflicts. Then click on “save the configuration” and “Install Driver” and reboot when its all done. Checking under device manager will show the new com ports.
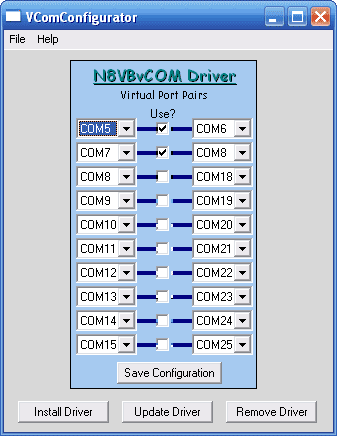
Note that under device manager, there was an apparent warning under one part of the com port listing, but Im not sure what it affected, as it worked just fine.
Step 4: Install VAC
Get the files unzipped in a directory on your desktop and double click on the setup file. The first pop-up asks if you’re an “advanced user” I was not sure, but I clicked it anyway so I'm not sure what good it does.
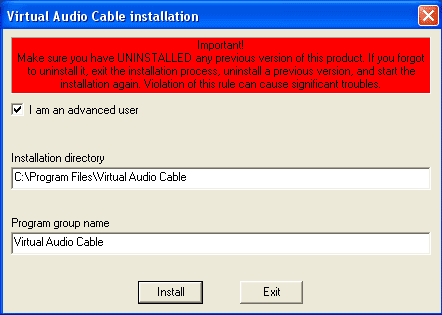
The computer whirs a bit and indicates that the VAC is being configured, hit the “OK” prompt when it’s done.
Under your “All Programs” you will see the new program group Virtual Audio Cable and click on “Control Panel”.
The VAC control panel looks like this in the default installed settings.
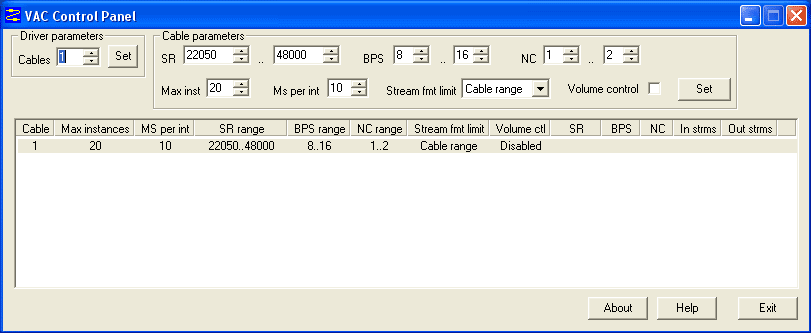
Lets make the setting in the VAC panel….
First change the "Cables" to “2” and hit the “Set” button. The driver resets and then the screen looks like below…
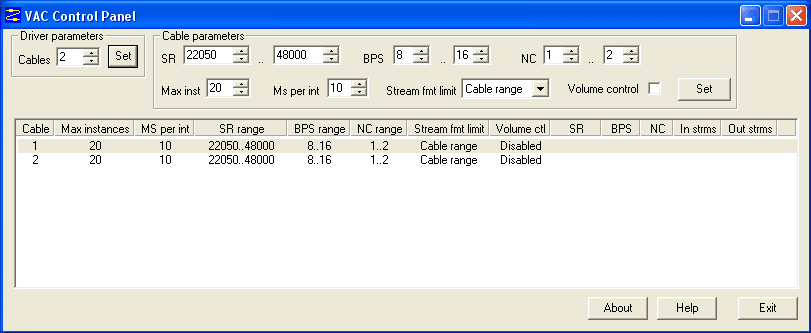
Click on cable 1 in the main window and the whole line highlights, then one is able to make settings for that cable.
Make the following cable parameter setting changes of SR to 11025 and make Stream fmt limit to “Cable format” Hit the set button. Do the same for cable 2 and set that one as well. Note that the upper end of SR is already set at 48000.
If you run 96 KHz sampling rate (SR) on the SDR-1000, then you need to change the upper end of both cable 1 and 2 to 96000. This is the only thing I found that was not automatic about this whole setup, so if you switch back and forth on your SDR-1000 from 48 to 96 KHz sampling rate, and then use VAC, one need to be sure this is set correctly or it will not work. Not a big deal, one just has to remember. Actually your computer will tell you “invalid sample rate” or something similar if its set wrong, so no worries here. Below is what the screen looks like at this time.
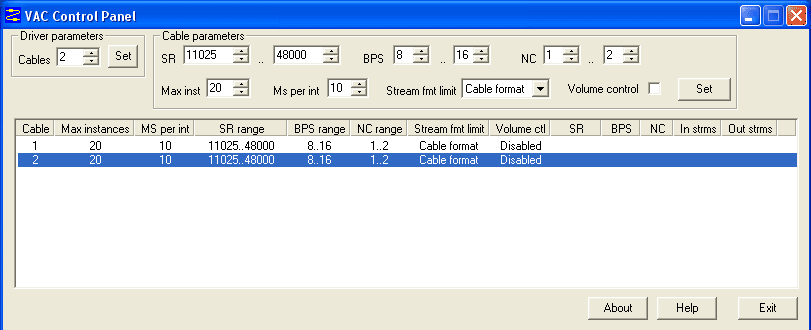
A word on the “Ms per int” portion of the VAC setup screen. The default setting looks to 10, and worked just fine on a Dell XPS400 with a Dual Core 2.8 GHz processor. However, doing the same settings on a Dell XPS Generation 4 computer with a P4 3.8 GHz processor, I got all sorts of hiccups. The audio on the “Spec JT” screen was up and down every 10 seconds or so, from -30db to +7db. I finally got it settled down when I set the “Ms per int” to 1 for both virtual cables. Just FYI if your having strange problems getting the audio RX noise in WSJT to be sitting at 0 db. (I still had a few problems on and off. The setup would work for minutes at a time, but would go whacky. So I also changed my VAC buffer setting from 1024 to 2048.)
Note that when you get VAC setup, then you need to change your Windows XP settings for the sound mixer.
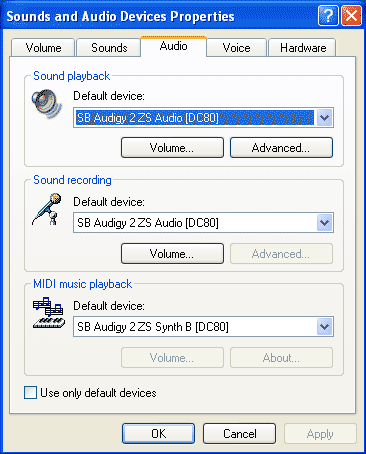
The mixer default will look like something like above, whatever sound card you have set up for windows sounds. I run a Delta 44 sound card for my SDR-1000, but I have an Audigy 2 ZS in the computer as well that does the windows sounds. Neither one see one another and it works great. I can do the SDR-1000, and listen to tunes as well!
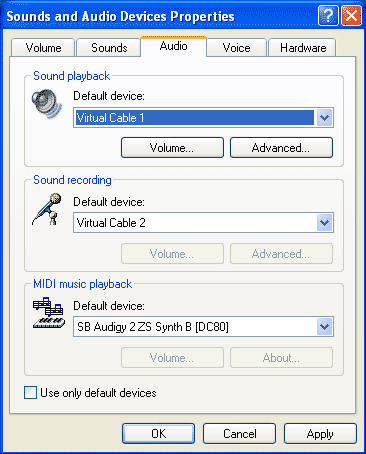
Then make the above changes to select the VAC cables. If this disables your windows sounds, there is apparently some other program that can repeat the output, but I have not experimented with it. I simply leave the sound recording portion on cable 2, but then switch the playback cable back to the Audigy 2 ZS card when I'm done doing VAC.
Step 5: Setup within PowerSDR
Open the setup menu in PowerSDR to the VAC tab…. Change Input to Virtual Cable 1 and Output to Virtual Cable 2. Then click on the auto enable area “Enable for Digital Modes”. This enables VAC only when you use the DIGU or DIGL mode buttons. I also changed the buffer size to 1024 initially.
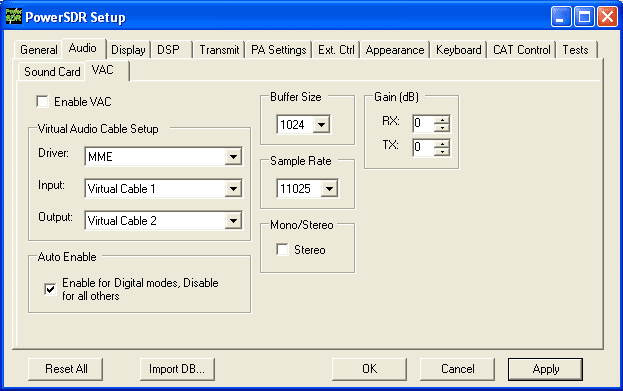
Then go to the CAT Control Menu….
Make the following setting changes and enable both the CAT and PTT control checkboxes. I left the ID as TS-2000 without any issues.
I believe that the COM5 / COM6 pair is for PTT Control, while COM7 / COM8 is for CAT control. Here in PowerSDR, one uses one half of each pair, while the other half of the pair is setup inside of WSJT. You will see that further down the page.
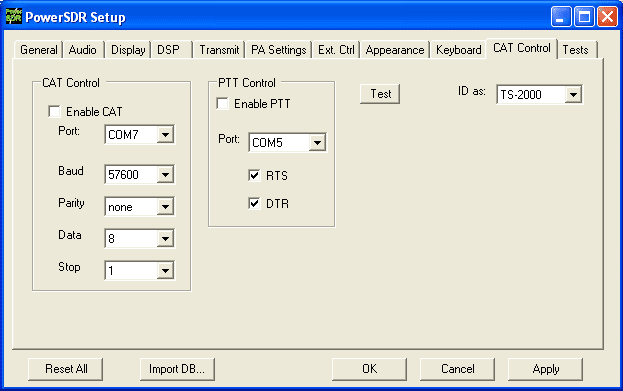
Note that when you make these above changes and then click the enable buttons, then the selections go un-highlighted and are non changeable. Don’t forget to check the enable buttons!
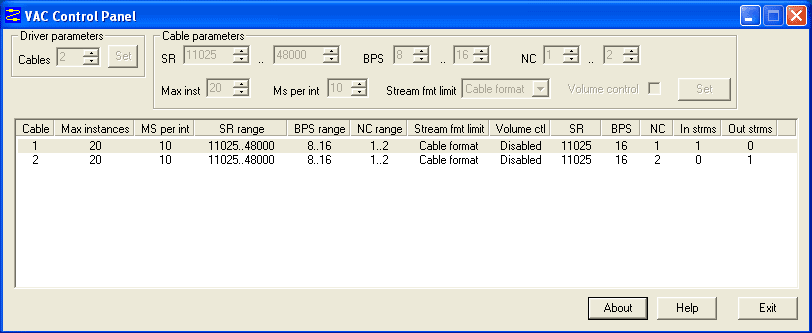
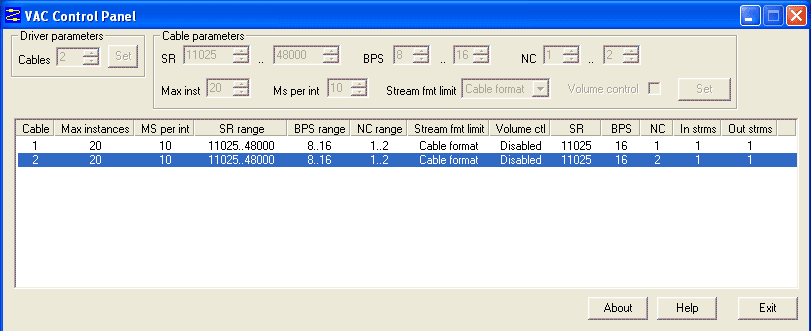
At this point, after you hit the DIGU or DIGL button, the VAC control panel should show this…
Now onto WSJT final settings...
Step 6: Specific WSJT Settings
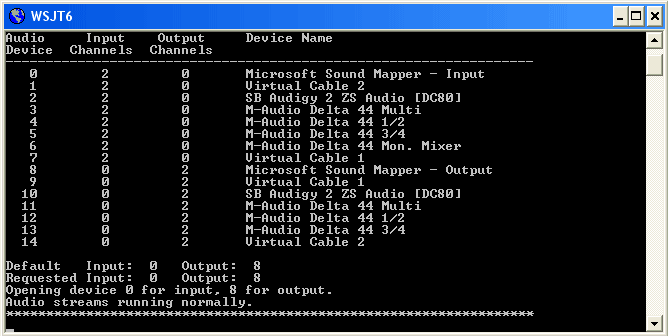
When you open WSJT, the sound mapper screen will probably show an error like below…
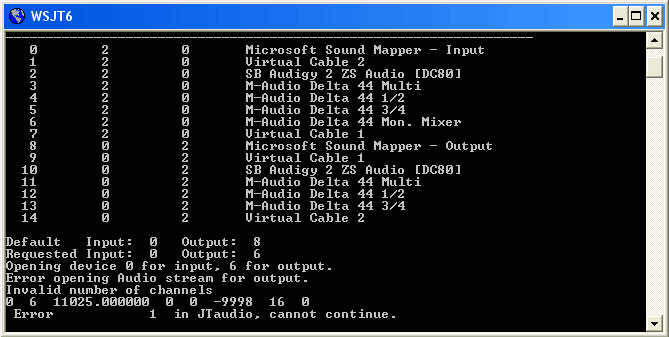
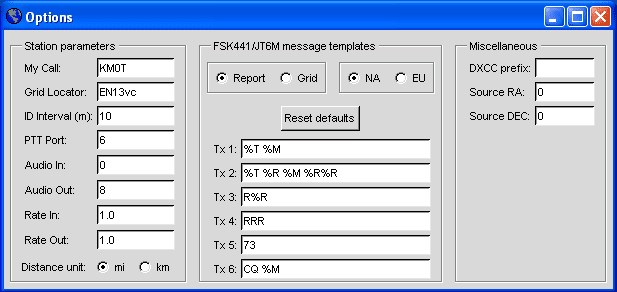
The default WSJT options screen (other than call and grid) might look like the below. Compare the “Default Input” and “Requested Input” number from the first console box. Both are 0 in this case, so that’s ok. Note that on the Options screen “Audio In:” says 0 as well.
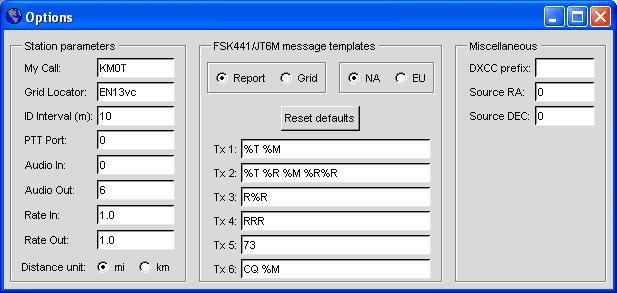
However, the “Default Output” is 8 and “Requested Output” is 6. So change 6 in the Options screen to 8 in the “Audio Out:” part and close the box and exit the program. The next time you start WSJT, the audio mapper screen should look like…
Also, with DIGU mode selected and WSJT running, the VAC control panel should look like the screen shot below with all the ins and output streams showing a 1.
Now to set the com port stuff inside of WSJT. Open the options screen once again and set PTT Port: to 6 (Related to the COM5 / COM6 pair) This should give PTT control of PowerSDR from WSJT when the “Auto” button in WSJT is highlighted "red" on.
You can test this by hitting one of the six tx buttons on the lower right side of the WSJT screen. When you do this, the MOX button on the PowerSDR screen should be yellow.
One last thing is to do is to set the RX level on the PowerSDR screen. Looking at the bottom of the WSJT screen should show some value of “Rx Noise” If the box is just red in color and sitting like at -40 db, then check to see if you clicked the “Monitor” button just below the message screen. Then the audio level “Rx noise” should come up to some value, typically a level over 0 db. Mine for instance came in around +14 to +20 db in two different computers. I then adjusted the “RX Gain at the “Mode Specific Controls – Digital” part of the PowerSDR screen to -14 and -20 respectively to get the WSJT screen to show “Rx noise” to be 0 db.
Note that at the very lower left of the WSJT screen there is two numbers that hang around 1.0000. These may vary a bit up and down .0001 or .0002. If these are pretty solid, I'm told that the programs sampling rates are compatible and the audio streams are being received / transmitted correctly.
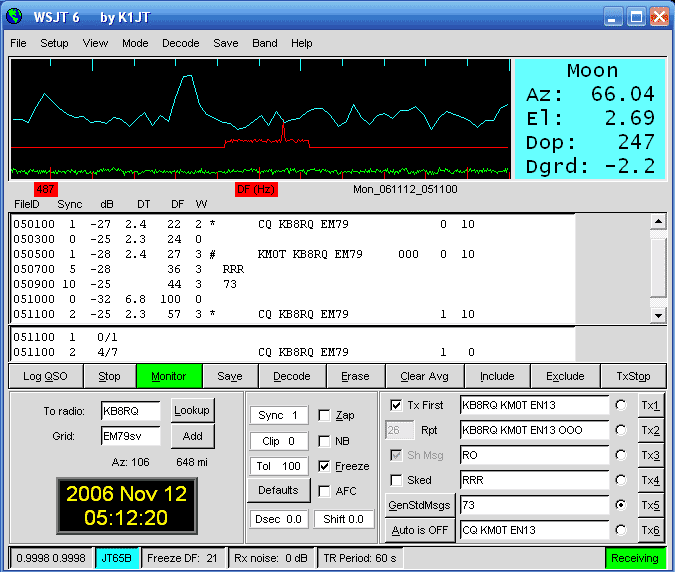
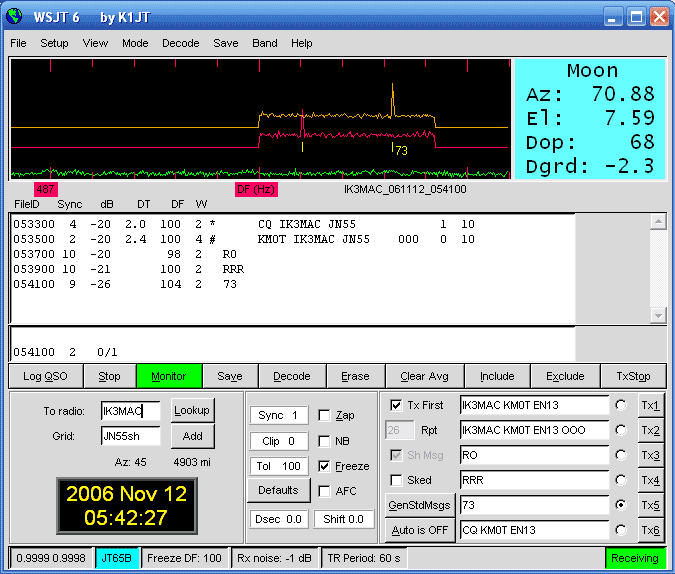
Above are a few screen shots of a JT65B EME contacts done in November during the ARRL EME Contest. It was pretty neat. I never even heard KB8RQ, he just popped up on the screen! I then did a random with IK3MAC a bit later. I heard he was on and actually saw his signal on the SDR-1000 bandscope while I was getting set up. It was really too easy!
I hope the above helps some folks out. Its been fun!
73
Mike - KMØT